Start with a non-destructive scan in the old-house room

Product use sequence

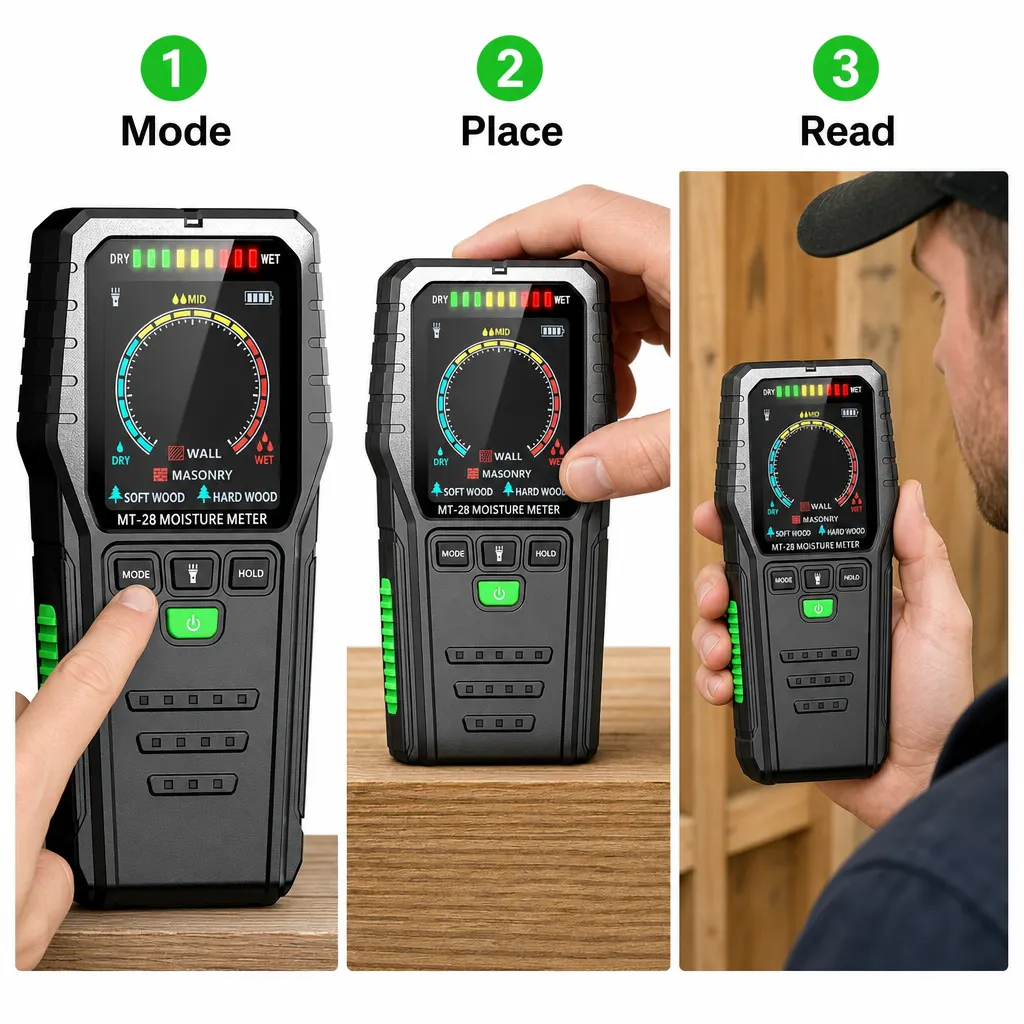
If you searched for a wall moisture scanner old house, use the R&D INSTRUMENTS MT-28 as a non-destructive first pass: choose the closest documented material mode, scan a nearby reference area, then move across the suspect wall and record where the indication changes. It is described as a pinless capacitance moisture scanner, listed with a 5–75% measurement range, a backlit LCD and green, yellow and red LED indications. That combination is intended to help you compare accessible wall surfaces, wood and masonry without making holes or marks. Treat each result as an indication for further checking, not a diagnosis of rising damp, a leak or any other moisture source.

The buying decision is therefore whether you need a repeatable, surface-friendly map before you choose the next step. In an old-house hallway, bedroom, loft, basement or kitchen, you may be checking a stain, peeling paint, a skirting area or a ceiling edge; you may also want to record change after ventilation or repair work. The product information supports comparative scanning, but it does not state a moisture-source diagnosis, scan depth, calibration detail for every substrate or a formal survey purpose. If the wall build-up is unknown, those missing details should remain part of your decision rather than being filled in by assumption.

Set the UK job: map a wall, not diagnose the damp

Set the job in a real room before touching the scanner. At a plastered stairwell in a UK terrace, for example, map one wall face, the skirting zone and a nearby area that looks similar rather than taking a single reading at the darkest mark. The description names walls, ceilings, floors, wood and masonry as intended checking locations. That makes a room map more useful than an isolated number: note the room, height, surface and visible feature, then compare points on the same type of surface. If you are working around an old fireplace or exposed masonry, keep that area separate from painted wall readings.

Write down why you are scanning: a recurring mark, a recent leak, a decorating decision or a change you want to monitor. Then keep the question narrow: where is the indication higher or lower, and does it change at the same points later? The three-colour LED is described as a dry, moderate and high moisture indicator, so colour can help you spot a transition while moving across a surface. It does not, on the supplied facts, identify whether the cause is rain ingress, plumbing, condensation, ground conditions or something else. Your notes should preserve that distinction.

Check the scanner against old-house surfaces before buying

Check the surface fit against the listing, especially in a house where one wall may not have one consistent build-up. The product is identified as an MT-28 wood moisture meter, while its description presents four material modes for wall surfaces, masonry, hardwood and softwood. It also mentions uses around concrete and building materials, as well as furniture, flooring and ceilings. Those are the documented categories to compare with your job. If you need a reading on a particular plaster, paint system, lime finish or composite board, do not assume that a named wall or masonry mode explains its response; look for operating guidance before treating the result as comparable.

Check the physical and display details too. The body is listed as 150 × 67 × 28.5 mm, which lets you judge whether its size suits the hand position and access around a narrow skirting board, ceiling corner or cupboard. Its large backlit LCD and tricolour LED are described for clear viewing, including lofts, basements and dim spaces. The frozen product facts do not list kit contents or a full setup procedure, so do not assume that probes, a case, spare batteries, a charger or a particular calibration routine are included. Confirm those points in the current instructions or listing before purchase.

Use a room-by-room old-house scan checklist

Use this old-house scan checklist in a hallway, kitchen or workshop bench area: first, confirm the surface falls within the described wall, wood or masonry categories; second, select the matching one of the four material modes; third, note the room, exact point, surface finish and date; fourth, scan a nearby reference point before the suspect zone; fifth, move in a consistent route and record the displayed number plus LED colour; sixth, repeat the same points if you are monitoring change; seventh, label every entry with its material mode. This sequence uses the scanner as a mapper, not as an unexplained pass-or-fail test.

Keep the comparison fair. A wall reading taken in the wall-surface mode should be logged separately from a timber floor or exposed masonry reading, even if they are only a metre apart. The 5–75% range is a listed product attribute, but the supplied information does not say that a displayed percentage has the same meaning across every material mode or older wall construction. Look for patterns within like-for-like points: an indication changing around a stain, along a skirting line or towards a ceiling edge can tell you where to investigate next. It cannot by itself prove that the wall is drying or establish the source.

Spot old-house mismatches before trusting a pattern

Mixed finishes are the main mismatch to think through before buying for an older property. A scan may pass from decorated plaster to exposed masonry, timber trim or flooring, and a single route can then combine different surfaces. The product's mode options do not make those surfaces interchangeable. If you cannot identify what is under the finish, mark the point as uncertain and compare only with another point that appears to share the same construction. This is especially important before covering a wall with paint, lime plaster or another finish, because a tidy-looking surface does not resolve an unclear reading.

Nearby metal, pipes, foil-backed materials, surface shape and wall thickness are all sensible questions, but the frozen product information does not explain their effect on this scanner's capacitance indication. Do not silently turn that missing information into a claim that a red light means a leak. Instead, record anything unusual beside the point: a fixing, service route, corner, joint or composite patch. If the pattern follows a feature rather than the visible mark, use the result to frame a question for the product instructions or an appropriate professional. That cautious note is more useful than presenting an uncertain reading as a confirmed finding.

Know when this scanner should not be your only step

Do not buy this scanner as your only answer if the job requires the exact cause behind a wall, a formal survey report, a certified measurement or a decision based on one universal threshold. The public facts describe a DIY & Tools product for non-destructive scanning and list a range, modes and visual indicators; they do not state certification, professional accreditation, calibration across every old-house substrate or a diagnostic conclusion. If a landlord, insurer, surveyor or contractor needs a formal record, ask what evidence they require. A personal scan can help you explain a pattern, but it should not be presented as a survey or a diagnosis.

It is also a poor fit when you specifically need pin contact, a documented probe arrangement, a supplied accessory or a stated operating procedure that is not in the frozen listing. The scanner is pinless and intended for non-invasive checking; that documented design does not answer requirements the product never claims to meet. If water is actively entering, electrical or building work is underway, or a persistent and unexplained pattern needs opening-up, pause and use the appropriate trade or survey route. Do not rely on an unrecorded consumer indication to decide that a problem is safe, solved or ready to cover.

Take the next step before decorating the old-house kitchen

Before decorating the old-house kitchen or stairwell, turn the scan into a dated handover rather than a final verdict. Photograph the wall, draw a simple grid and write the material mode beside each point. Add the displayed value, LED colour, room conditions you can observe and the reason for the revisit; do not invent missing technical details. If you have had ventilation, repairs or a drying period, repeat the same route and place both sets of notes together. A rising, falling or unchanged pattern tells you what to discuss next, while a single colour or number should not decide whether to paint.

Use that record to choose the next action: keep monitoring comparable points when the concern is limited and changing; ask an independent surveyor or relevant trade to investigate when indications remain high, spread or conflict with what you can see; or verify the substrate and instructions before scanning again when the mode is uncertain. For the buyer, the final check is simple: the listed 150 × 67 × 28.5 mm body, 5–75% range, pinless capacitance method, four material modes and backlit three-colour display should all match the job you actually have. If they do, buy it as a mapping aid with clear limits, not as proof of a damp diagnosis.