Use a non-invasive meter to map plaster, not to name the damp source

A non invasive damp meter for plaster walls is most useful for comparing one part of a finished wall with another without making holes. Scan a suspected patch, continue into the surrounding surface and record where the displayed indication rises or falls. Repeat the same route later if you are monitoring a stain, a repaired leak or a wall before decorating. Treat the result as a moisture pattern rather than proof of condensation, plumbing leakage, rain ingress or any other specific cause.
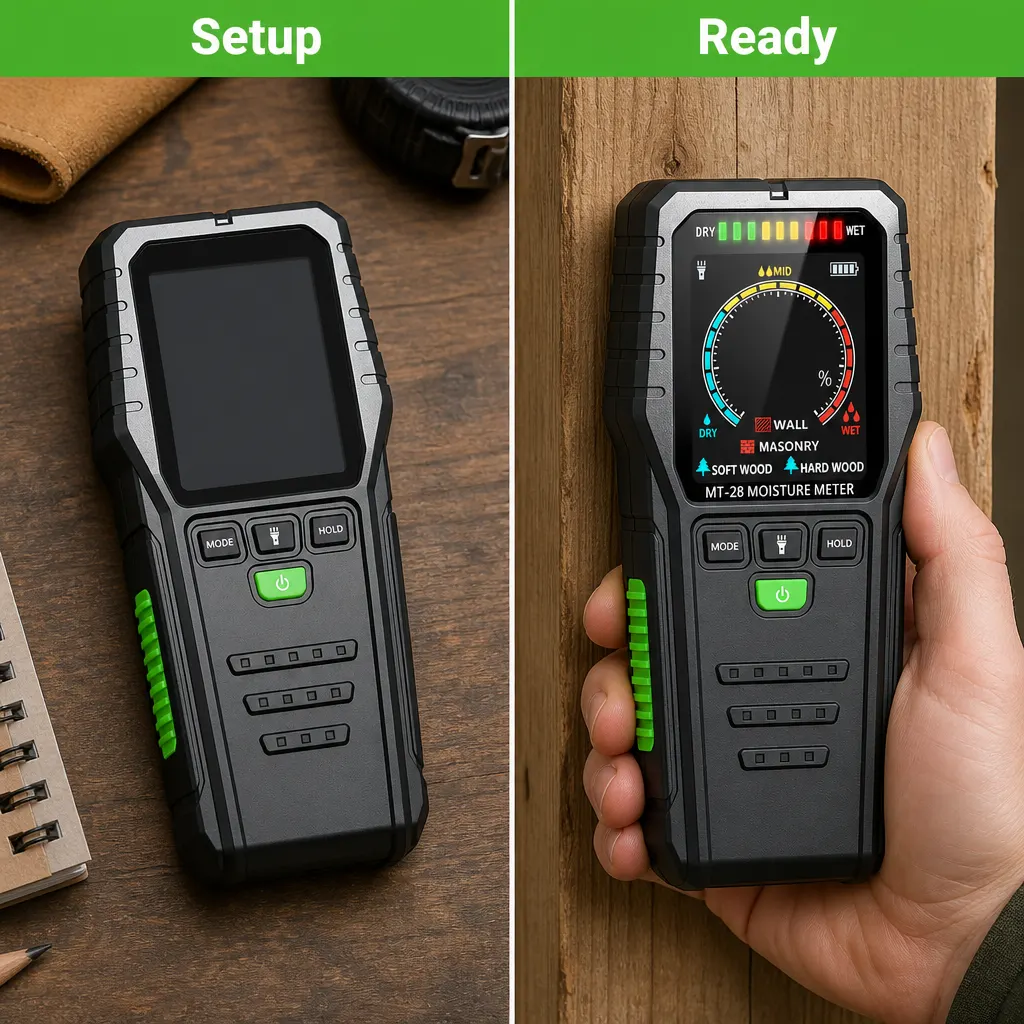
This approach suits a homeowner working room by room, a decorator checking an area before starting work, or a property inspector conducting an initial sweep. The documented product is a pinless capacitance scanner intended for walls, ceilings, floors, wood and masonry. It has a backlit LCD, a three-colour indicator and four listed material modes covering wall surfaces, masonry, hardwood and softwood. Those facts support comparative scanning, but they do not turn one displayed number into a diagnosis.
Set up a repeatable check in the room you are investigating
Begin with one clearly defined room or work area rather than taking unrelated readings around the property. On a plaster wall in a kitchen, bedroom or workshop, choose an accessible section that appears unaffected and is as similar as possible to the suspect section. Keep the comparison on the same kind of surface instead of moving from painted plaster to exposed masonry or timber and treating every indication as equivalent. The available modes are material-specific, which makes the surface being scanned an important part of each note.
Create a simple grid on paper or in a phone note. Identify points by their position, such as left of window, above skirting, centre of stain and clear wall to the right. The scanner is non-invasive, so you can return to the same decorated areas without intentionally puncturing them. Record the selected mode, displayed indication, colour shown and date. Photographs can help you relocate each point, particularly when a visible mark changes or disappears before the next scan.
Check the documented wall and masonry modes before buying
The strongest documented match for this job is the inclusion of modes for wall surfaces and masonry. That is more relevant to plaster-wall mapping than a device described only as a wood meter. The listing also names walls, ceilings, floors, wood and masonry as intended scanning surfaces. If your immediate task is following a suspicious patch across a painted wall or around the edge of a ceiling stain, those stated surfaces align with the basic job.
There is, however, a detail worth checking carefully. The archived attributes identify the item as an MT-28 wood moisture meter and list a 5–75% measurement range, while the description presents it as a pinless scanner with four material modes. The documented information does not explain how that percentage range applies to plaster. Do not assume that a figure shown on plaster represents a direct plaster moisture percentage. For this use, the defensible approach is to compare indications on similar wall surfaces and follow the pattern.
Use the display to follow changes across dim or awkward areas
The backlit LCD is a practical consideration when the suspected area is in a loft, basement, cupboard or shaded wall corner. A readable screen can make it easier to move through a planned set of points without repeatedly changing the room lighting. The scanner also has a green, yellow and red indicator intended to distinguish lower, moderate and higher moisture indications. Use those colours as a quick mapping aid while still writing down the displayed result and location.
Avoid reducing the whole check to a single red, yellow or green point. A more useful map might show that the indication is higher near the lower left of a wall, changes towards the centre and becomes lower on a comparable section farther away. That shape gives you something concrete to monitor or describe. It still does not establish why the pattern exists. The value comes from consistent coverage of the surface and repeatable notes, not from attaching a cause to one colour.
Follow a plaster-wall mapping sequence at the work area
Use this working sequence: identify the visible or suspected area; choose a comparison area on a similar wall surface; select the documented wall-surface mode; note the date and exact locations; scan the comparison points first; move across the suspect area in evenly spaced stages; record the display and colour at every point; then repeat the same route after the relevant monitoring period. If you move onto exposed masonry, note the surface change and select the listed masonry mode rather than merging those results with the plaster-wall set.
Your checklist should name six concrete checks. Size: the body is listed as 150 × 67 × 28.5 mm, so decide whether that format suits the places you need to reach. Surface: confirm whether you are scanning a wall surface, masonry, hardwood or softwood. Setup: select the corresponding mode and use repeatable points. Content: no separate kit contents are documented. Environment: the backlit display is intended to remain readable in dim spaces. Aftercare: keep dated notes so later scans can be compared with the original route.
Recognise the mismatches before relying on a plaster reading
This product is a poor match if you need a documented, plaster-specific moisture percentage or a formal statement of the cause. The public information names a wall-surface mode but does not provide a dedicated plaster mode, a plaster calibration table or an interpretation threshold for plaster. It also does not document a method for distinguishing among different sources of moisture. A homeowner should therefore avoid presenting an isolated indication as proof of a particular damp mechanism.
It may also be the wrong choice when your task depends on kit items or procedures that are not listed. No kit contents are documented, and no formal usage steps are supplied in the frozen product facts. Buyers who require a specified accessory set, a documented plaster scale or a tool for a formal measurement process should not fill those gaps with assumptions. The honest fit is a compact, pinless first-pass scanner for mapping relative changes over accessible surfaces covered by its listed modes.
Compare like with like before decorating or arranging further work
Before decorating a plaster wall, compare the suspect patch with a nearby area made and finished in the same way. Keep the material mode consistent, scan the same marked positions and retain the sequence in your notes. If you later repeat the check, use the same route rather than choosing convenient new points. This creates a more useful record than several readings taken from unrelated walls, ceilings, timber and masonry around the property.
For a decorator, maintenance operative or homeowner, the record can support a clearer conversation about the next task. It can show where the indication changed, which material mode was selected and whether the pattern altered between checks. Describe the findings cautiously: for example, state that one zone produced a higher indication than a same-surface comparison area. Do not convert that observation into an unsupported claim that the scanner has identified a leak, confirmed a wall is ready for paint or established a specific form of damp.
Choose the scanner only when its documented fit matches your next step
Choose this scanner if your immediate job is a non-destructive sweep of accessible walls, ceilings, floors, wood or masonry and you can work with comparative indications. Its documented points are pinless scanning, four material modes, a backlit LCD, a three-colour indicator, a listed body size of 150 × 67 × 28.5 mm and an archived 5–75% range associated with its wood-meter attributes. For plaster, focus on wall-mode comparison rather than assuming that the archived range supplies a plaster-specific percentage.
Before buying, write down the exact surface and the answer you expect the tool to provide. If the answer is “show me where the indication is relatively higher or lower across this plaster wall without making pinholes”, the documented design is aligned with the task. If the answer is “tell me the exact moisture content of plaster and identify the cause”, the available facts do not support that expectation. A grounded next step is to plan a same-surface grid, decide how you will record it and use the resulting pattern to determine whether to monitor the area or seek further investigation.