Use a wall moisture meter to map a pattern, not diagnose a cause

If you need a pinless moisture meter for walls UK properties can present, use it as a non-destructive mapping tool rather than expecting one reading to identify the cause of damp. Select the mode that matches the surface, compare the suspect patch with a nearby area made from the same material, and record several readings across a simple grid. This gives you a practical pattern to monitor before decorating, after a leak or while deciding whether further investigation is justified.
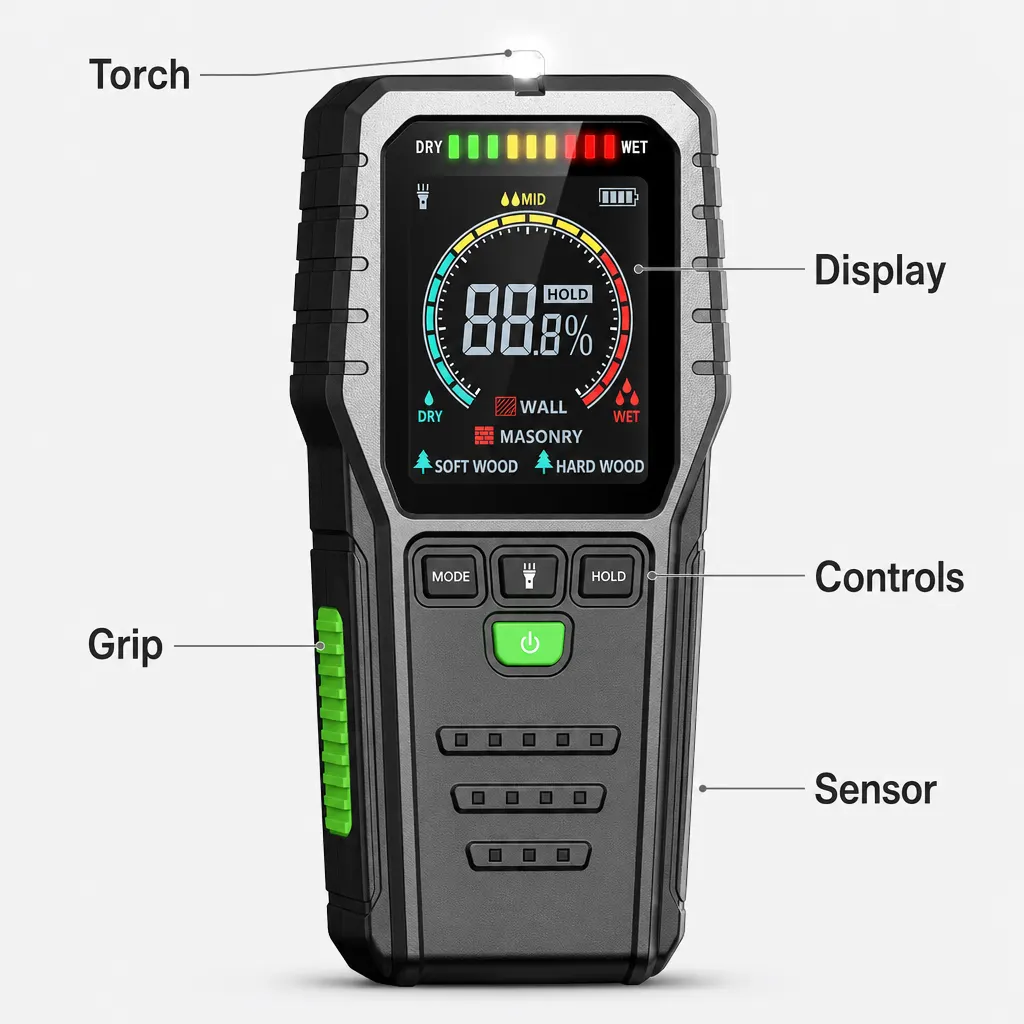
The R&D INSTRUMENTS scanner is described as using pinless capacitance technology, so the initial scan does not require holes, scratches or pin marks. Its documented modes cover wall surfaces, masonry, hardwood and softwood, while the backlit display and green, yellow and red indicators are intended to make differences easier to see. Those facts support comparative screening across accessible surfaces; they do not turn the displayed result into proof of rising damp, condensation, rain ingress or a plumbing fault.
Set the job before scanning a UK house or workshop
In an older UK house, the immediate job may be to understand staining near skirting, peeling paint on an outside wall or an area awaiting lime plaster and breathable paint. After a plumbing or roof leak, it may be to trace the apparent boundary around a mark and see whether that boundary changes. In a decorator’s workshop or during a property maintenance visit, the job may simply be to decide where closer inspection should begin without puncturing a finished surface.
Write down that job before switching on the meter. A useful question is narrow and observable: is the indicated area concentrated beneath the ceiling stain, does it extend along the skirting, or is the same location changing after the suspected source has been addressed? An unhelpful question is whether the scanner can name the damp mechanism on its own. Defining the task keeps the result in proportion and prevents an isolated colour or number from becoming an unsupported diagnosis.
Check the documented specification against your surfaces
The product description documents four modes for wall surfaces, masonry, hardwood and softwood. That makes the scanner relevant when the intended route includes plastered walls, exposed masonry, ceilings, floors or timber, provided each surface is treated as its own comparison. The listed attributes also identify the item as an MT-28 wood moisture meter with a stated 5–75% measurement range. Do not assume that numbers collected in different material modes are directly interchangeable.
The body size is listed as 150 x 67 x 28.5 mm, which is worth checking if you intend to carry it between rooms or keep it with decorating and maintenance tools. The display is described as a large backlit LCD accompanied by a three-colour LED indication: green, yellow and red. This arrangement can help when scanning a loft, basement, cupboard or dim corner, but readability is separate from interpretation. A clear indication still needs a recorded location, surface type, selected mode and suitable reference point.
Build a repeatable wall and ceiling scanning route
Start with a visual inspection of the room and note the visible mark, peeling finish, mould patch or repaired leak location. Choose an accessible reference area on the same type of surface, then select the corresponding wall, masonry, hardwood or softwood mode. Move across the suspect area in an orderly route rather than taking one convenient reading. For a wall, that might mean rows running from skirting level upwards; around a ceiling stain, it could mean points extending outwards from the visible edge.
Give each point a simple name such as wall A, row 1, point 1, and record the displayed result or colour indication with the date. Photographing the route can help you return to approximately the same places, but the written record should still identify the room and material. When checking change after ventilation, repairs or drying, repeat the same route in the same mode. The useful result is the direction and shape of the pattern, not a single unexplained figure copied into a notebook.
Use this room-by-room moisture mapping checklist
For size and access, confirm that the 150 x 67 x 28.5 mm body can be positioned against every accessible point you intend to compare. For surface selection, identify whether each area is a wall surface, masonry, hardwood or softwood and use the corresponding documented mode. For setup, label a same-material reference area and define a grid around the suspect zone. For content, record the room, exact location, material mode, displayed indication, date and any visible staining or finish damage.
For environment, use the backlit display where the location is poorly lit and keep comparisons within the same type of surface rather than combining walls, timber and masonry into one sequence. For aftercare, retain the map and repeat it after the chosen monitoring interval, ventilation period or completed repair. Compare like with like: same location, same material mode and the same route. If the indicated zone remains elevated, spreads or does not match what you can see, treat the record as a reason to investigate further rather than as a final explanation.
Avoid mismatches between the meter and the question
This product is a poor match if you need one device to certify that a wall is dry, provide a formal building diagnosis or identify the exact source behind a finished surface. Its documented purpose is non-destructive moisture scanning across walls, ceilings, floors, wood and masonry. That can reveal a relative pattern worth following, but the product facts do not establish that it replaces a surveyor, plumber, roofer or other relevant trade when the source is unresolved.
It is also a mismatch to compare a reading on timber directly with one on masonry as though both represent the same material response. The presence of four modes is a prompt to separate those checks, not merge them. Likewise, a homeowner preparing to paint should not reduce the decision to one green, yellow or red indication. Consider the mapped trend, visible condition and whether the suspected source has actually been addressed before committing to finishes that could conceal an unresolved problem.
Turn an elevated area into useful evidence for the next visit
If the scan identifies a concentrated or spreading zone, prepare a concise record for whoever needs to inspect it next. Include a room photograph, the scan route, the selected material mode, dates and the points showing relatively higher or lower indications. Add factual context such as a recent plumbing escape, roof staining, recurring patch or approaching decorating work. Avoid labelling the result as a confirmed leak or a specific form of damp unless that conclusion has been established separately.
This record can make a conversation with a landlord, surveyor, decorator or relevant trade more focused. Instead of reporting that the whole wall is damp, you can explain where the indication begins, how far it appears to extend and whether it changed after ventilation or repair. For a maintenance operative or property inspector, the same approach helps keep client notes cautious: the scanner supplied an indicative, non-destructive pattern, and the observations may justify more targeted investigation where appropriate.
Choose the scanner only if comparative mapping solves your problem
Before buying, match the documented facts to the intended job. Choose this type of scanner if you want a pinless first pass across accessible wall surfaces, masonry, hardwood or softwood; need a backlit LCD and three-colour indication; and are prepared to compare several points rather than rely on one number. Its listed 5–75% range and four material modes should be read alongside the product’s identity as an MT-28 wood moisture meter and its broader description as a wall-mapping scanner.
Your next step is to sketch the room and list the surfaces you need to inspect. Mark where a same-material reference point is available, where the suspected area begins and whether you can return to the same locations later. If that process answers your need to map and monitor without marking decorated or historically sensitive surfaces, the product is aligned with the job. If you instead require a definitive cause, formal documentation or specialist assessment, arrange the appropriate investigation rather than expecting a consumer scanner to provide it.